How I got RimWorld debugging to work
13 Aug 2020If you’ve ever done ‘real’ programming, you’ve likely used a debugger. The ability to watch variables, set breakpoints, and step through functions while querying locals is a massive help in troubleshooting complicated bugs.
Such a shame that we can’t debug RimWorld, right?
Wrong! We can attach a debugger to RimWorld, although finding out how to do that exactly is no easy feat. In this short guide I’ll describe the steps I’ve taken, so hopefully the process will go a bit easier for you.
A word of warning though, while I have some idea of what I’m doing, I do not fully understand the processes involved, so your results may vary.
This guide was written on and for Windows, and assumes you’re at least a little familiar with RimWorlds folder structure.
Make a backup
We’re going to be messing around with RimWorlds executables and dependencies, and this may break in unexpectedly interesting ways. Now is a good time to make a backup of the entire game folder. Alternatively, you can just reinstall the game or verify the game files integrity in the Steam client after things break. Either way, you’ve been warned!
dnSpy
Download and install dnSpy. dnSpy is a pretty damn good all-around decompiler, and we’ll also use it as a debugger.
- fetch the latest release from https://github.com/0xd4d/dnSpy/releases/latest
- you can use the .NET 4.7.2 version, as you’ll have that installed for RimWorld modding anyway.
- the release doesn’t have an installer, so extract the contents somewhere you can remember.
- now is a good time to create a shortcut on your quick start and/or desktop.
Unity Debug Executables
For RimWorld 1.1, I was able to get dnSpy attached by just using a patched Mono file, as per the steps in the next section. In RimWorld 1.2, I have found it necessary to replace the executables. This section describes how to do that.
We’ll need to get a copy of the debug versions of the unity player. These are distributed with Unity, so we’ll need to get a copy of Unity. But first, we need to find out which version of Unity we need.
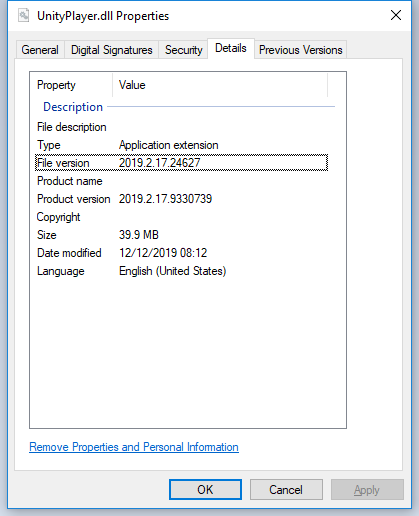
- navigate to the RimWorld install folder, and open the properties pane for
UnityPlayer.dll. Take a note of the file version in the details tab.
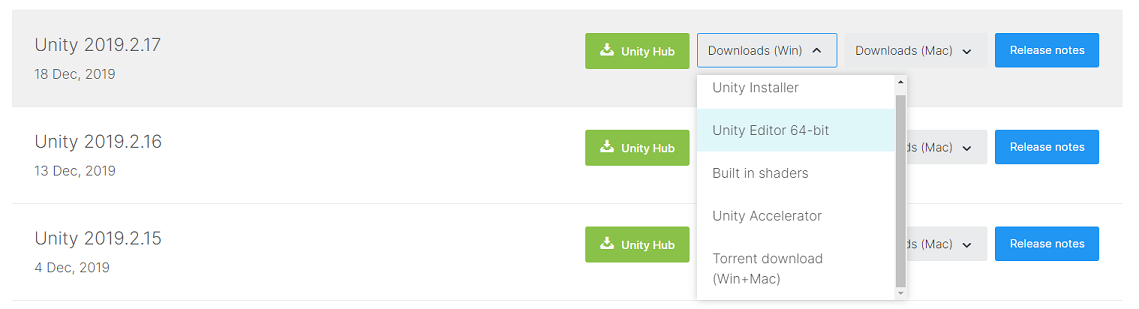
- take your favourite browser over to the Unity download archive: https://unity3d.com/get-unity/download/archive, and find the release that corresponds to the version in the previous step. At the time of writing this guide (the RimWorld 1.2 release), that would be
2019.2.17. - Download the (64 bit) Unity Editor. It’s just short of 1GB, so this may take a little while.
- This package includes the files we need. We can either install the editor and get the files after installation is done, or directly extract the files from the installer.
- Install the editor
OR - Open the installer with 7zip (or your favourite archiving software).
- Install the editor
- navigate to
[install-location OR archive-root]\Editor\Data\PlaybackEngines\windowsstandalonesupport\Variations\win64_development_mono -
copy the contents of the
Datafolder to theRimWorldWin64_Datafolder in your RimWorld installation, overwriting when prompted.NOTE: copy to `RimWorldWin64_Data`, NOT `Data`. - copy the following files to the root folder of your RimWorld installation, again overwriting when prompted;
UnityPlayer.dll
WindowsPlayer.exe
WinPixEventRuntime.dll
then, in the the root folder of your RimWorld installation;
- delete (or rename)
RimWorldWin64.exe - rename
WindowsPlayer.exetoRimWorldWin64.exe
next, in the RimWorldWin64_Data folder of your RimWorld installation;
- find or create the file
boot.config -
insert this line at the bottom of the file;
player-connection-debug=1
update: 2020-08-23 I forgot to mention a step…
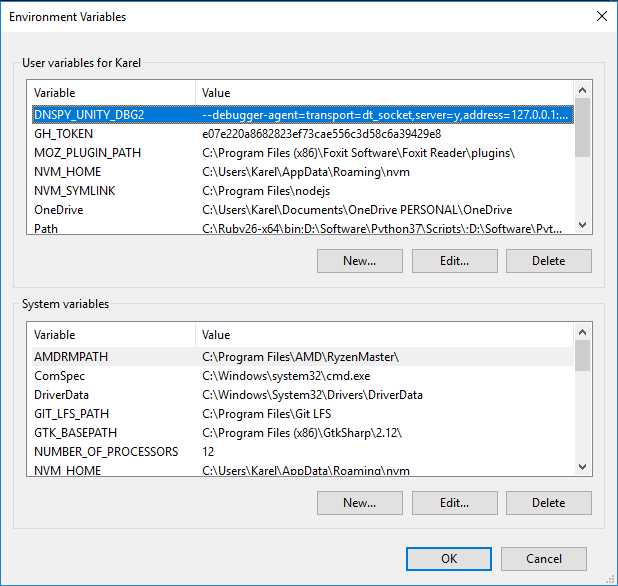
finally, you’ll need to add an environment variable that tells the Unity executables where to listen for a debugger.
- open the start menu, and search for “environment variables”.
- open either the system or account option for setting environment variables (they’re the same window)
- in the window that opens, click
environment variables. - create a new environment variable either system-wide, or for your account
- either way works, set it for your account only if you’re on a shared computer, or have no admin access.
- copy/paste the following details;
- name:
DNSPY_UNITY_DBG2 - value:
--debugger-agent=transport=dt_socket,server=y,address=127.0.0.1:55555,suspend=y
- name:
Your environment should now include the new entry:
Patched Mono library
The next step in the process is obtaining a patched version of Mono. I’ve had a debugger running on the 1.1 version of RimWorld by using just this step, and skipping the debug executables in the previous step. On 1.2, using the debug executables seems to be necessary and sufficient. I’m honestly not sure if this step is still necessary, but it (probably) won’t hurt either.
dnSpy provides a patched version of the Unity branch of Mono. We’re going to replace RimWorlds’ version of Mono with this patched version. The file we’re looking for is mono-2.0-bdwgc.dll. There are three main ways to get this file;
- dnSpy provides compiled versions for a number of (older) Unity releases here;
https://github.com/0xd4d/dnSpy/releases/tag/unity - you can compile a patched version of the Unity branch of mono yourself. Note that compiling Mono is already complex, and this adds two extra layers of abstraction from both Unity and dnSpy. If you can successfully pull this off, you probably didn’t need this guide. If you want to give it a try, there are instructions here;
https://github.com/dnSpy/dnSpy-Unity-mono/blob/master/README.md
https://github.com/Unity-Technologies/mono/blob/unity-master/README.md
https://www.mono-project.com/docs/compiling-mono/windows/ -
hope that somebody smarter than us has already compiled the required file, and has been kind enough to share it. This is a bit risky, you’re trusting some random persons’ code to run on your PC. Then again, we’re doing that every time we install a mod as well.
A google search for the file and Unity version we needs gives us two hits, both of which end up pointing to a compiled version in a github issue comment. I used this version, my bank account is still just as empty as before, and my PC hasn’t melted yet - so it’s probably fine.
https://github.com/0xd4d/dnSpy/issues/1392#issuecomment-602254675And a direct link to the file;
https://drive.google.com/file/d/1HrJvMUvEXVVUOESImljQ5jPKZiCWrhKj/
Once you’ve obtained this file, the next steps are easy. In the the root folder of your RimWorld installation;
- navigate to
MonoBleedingEdge\EmbedRuntime - make a backup of the
mono-2.0-bdwgc.dllfile - move the patched
mono-2.0-bdwgc.dllinto the folder.
Note that the patched version of the mono dll seems to be a bit slower, and I still don’t entirely trust it. I created a small batch file that handles switching around the original and patched dll’s for me;
// swapDlls.bat

mv mono-2.0-bdwgc.dll mono-2.0-bdwgc.dll.tmp
mv mono-2.0-bdwgc.dll.bak mono-2.0-bdwgc.dll
mv mono-2.0-bdwgc.dll.tmp mono-2.0-bdwgc.dll.bak
Debugging
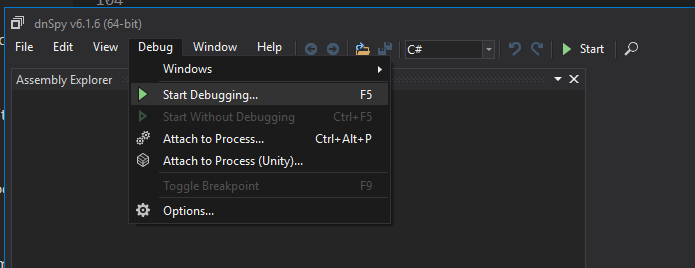
The final step is actually attaching the debugger.
- open dnSpy
- in the debug menu, click “Start Debugging…”.
Alternatively, you can also click the ‘▶ Start’ button in the toolbar, or press F5
- in the window that opens, navigate to the RimWorld executable. Leave the other settings as they are.
- I’ve had reports that setting the debug engine to ‘Unity’ works for some people, whereas ‘.NET Framework’ does not. While that makes perfect sense, I personally could not get that to work, so your mileage may vary.
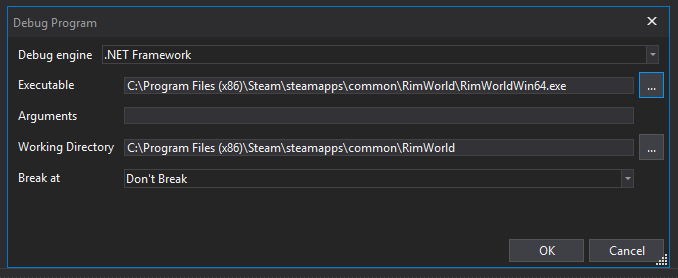
- I’ve had reports that setting the debug engine to ‘Unity’ works for some people, whereas ‘.NET Framework’ does not. While that makes perfect sense, I personally could not get that to work, so your mileage may vary.
- press ‘OK’. RimWorld will now open, and dnSpy will have an orange border to indicate it is actively debugging.
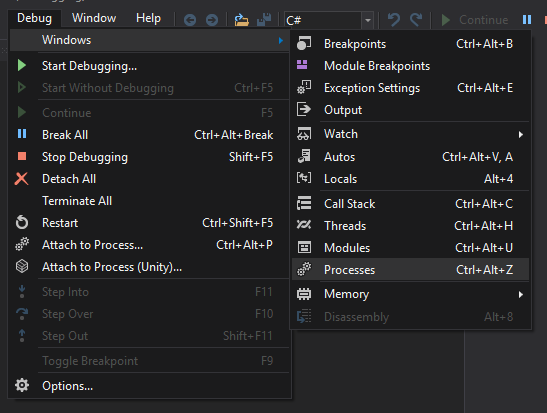
- check that the debugger is attached to RimWorld;
- in the debug menu, select “windows” and then “processes”.
- you should see the RimWorld process in the panel that appears;
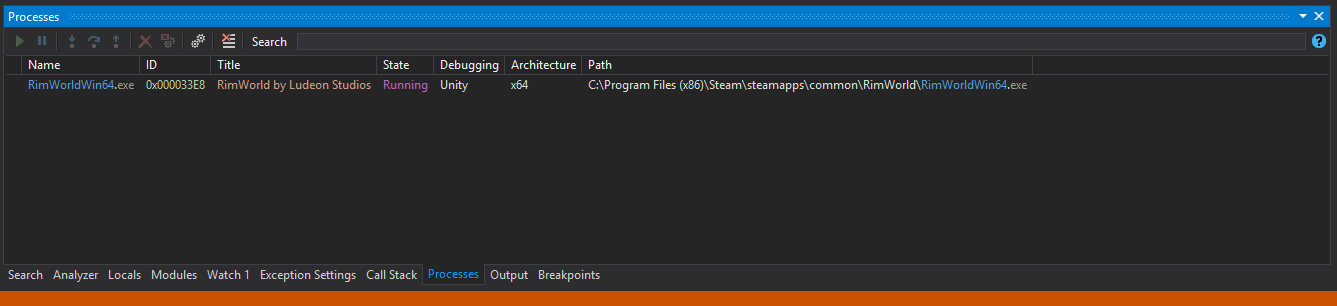
note that this seems to be a bit of a hit-or-miss, possibly timing related. - If the RimWorld process is not listed, we can manually attach to it;
- make sure RimWorld is actually running
- click “Attach to Process (Unity)…” in the “debug” menu
- select RimWorld in the window that pops up
- in the debug menu, select “windows” and then “processes”.
Congratulations, you can now start debugging like a pro!
If you need help in using a debugger, there are other guides for that. Here are some RimWorld modding specific tips to get you started;
- Enable breakpoints for null reference errors
null reference errors can be tricky to track down, but with the debugger automatically breaking exactly when they occur, they become a breeze to fix. Obviously, this also applies for other types of exceptions.- in the “debug” menu, click “windows” and then “Exception Settings”.
- in the panel that appears, search for
System.NullReferenceException - tick the box
- Setting breakpoints in mod code
Adding breakpoints is the meat and gravy of debugging, but it can be a bit tricky to find where to add them.- in the “debug” menu, click “windows” and then “Modules”.
- the panel that appears lists all dlls loaded by RimWorld (and there are quite a few!)
- search for entries with names like
data-00000234ACD4FA30, these are modded assemblies. - find the module for the mod you’re debugging.
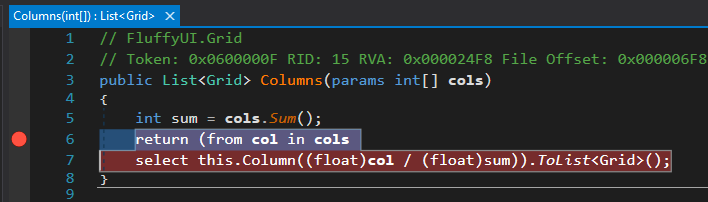
Annoyingly, there’s no real way to find out which assembly you’re opening without looking at the contained namespaces, so this may take some trial and error. The modules do appear to be listed in the order they were loaded. - add breakpoints by clicking in the left margin of the code window
Updates
Debugging with Visual Studio
@Snea on discord pointed out to me that you can also use the Visual Studio Debugger, which is obviously true! The VS debugger is strikingly similar to the dnSpy debugger, so I’m assuming they’re either inspired by eachother, or even share the same dependencies.
The VS debugger has some extra features (for example, it has an immediate window, essentially giving you a developer console), but it is also much more fiddly to set up. I was personally unable to get it to recognize any symbol files for the game assemblies, let alone modded assemblies, rendering the debugger almost useless. It’s likely that VS assumes we’re using .NET runtimes, while in fact we’re using the mono runtime. Either way, there’s probably a fix - I just haven’t found it yet.
Profiling with dotPeek
@Snea also pointed out that we can attach the dotPeek profiler. I had no problems attaching this to RimWorld, and it certainly looks promising for finding performance bottlenecks.
Setting Unity debug environment variables
2020-08-23
Added instructions for setting the correct environment variable, which may or may not be required.
Added note for using ‘Unity’ as debug engine suggested by @Brrainz.
Acknowledgements
A huge thanks to @Madara Uchiha on the RimWorld discord, for livening up my streams and being the first to explain hooking up the debugger to me in a way that I could understand.
dnSpy, for being amazing, as well as providing all the steps that I’ve used above. My only contribution was adding some RimWorld specific info, and dumbing down some of the instructions.
Kr4ken-9 for providing a pre-compiled version of the dnSpy patched mono assembly for Unity 2019.2.17.
Comments